Fragile dishware represents one of the most challenging categories to pack safely during relocation, requiring specialized techniques and materials to prevent costly breakage. The combination of delicate surfaces, varied shapes, and susceptibility to impact damage makes dish packing a skill that separates successful moves from disaster stories. Whether working with experienced last-minute movers in San Diego or handling the packing yourself, understanding proper protection methods becomes crucial for preserving your valuable dinnerware collection. This detailed guide covers professional-grade techniques for wrapping, organizing, and securing dishes throughout the moving process. By mastering these methods, you can confidently transport everything from everyday plates to heirloom china, knowing your dishes will arrive intact and ready for use in your new home.
Essential Packing Materials
Quality packing materials form the foundation of successful dish protection during transport. Invest in double-wall corrugated boxes specifically designed for fragile items rather than using random boxes that may lack the structural integrity needed for heavy dishware.
Packing paper provides the primary protective layer for most dishes, cushioning surfaces and preventing direct contact between items. Choose clean, acid-free paper that won’t transfer ink or leave marks on your dishes. Buy more paper than you think you’ll need, as proper dish packing requires generous amounts for adequate protection.
Bubble wrap serves as secondary protection for particularly valuable or delicate pieces. The air-filled pockets absorb impacts during handling and transport, providing superior cushioning for items like crystal glasses, fine china, or decorative serving pieces.
Dish packs or cell boxes offer specialized compartments for glasses and stemware, eliminating guesswork about proper spacing and protection. These purpose-built containers include cardboard dividers that create individual cells for each piece, preventing contact damage.
Heavy-duty packing tape secures boxes properly and prevents accidental opening during transport. Use tape liberally on box bottoms and tops, creating reinforced seams that can handle the weight of packed dishes without failure.
Proper Dish Wrapping Techniques
Individual wrapping creates protective barriers that prevent chips, cracks, and scratches during transport. Start with clean dishes to avoid trapping dirt or food particles that could cause damage during moving.
Begin wrapping by diagonally placing a sheet of packing paper on your work surface. Position the dish in the center and fold one corner over the item, followed by the opposite corner, then the remaining corners. This envelope-style wrapping creates multiple protective layers around the entire piece.
Add a second layer of packing paper for valuable or delicate items, wrapping in the opposite direction to create crossed protection that covers all surfaces thoroughly. Secure the wrapping with tape, but avoid placing tape directly on dishes where adhesive residue might remain.
Handle plates by wrapping them individually rather than bundling multiple pieces together. Bundle wrapping may seem efficient, but it creates pressure points where plates contact each other, increasing the risk of damage during transport.
Wrap serving pieces and large platters with extra care, using additional padding around handles, spouts, or protruding elements that could break if subjected to pressure. These vulnerable areas need special attention to survive the rigors of moving.
Organizing Packed Dishes
Strategic organization within boxes prevents damage while maximizing space efficiency. Create a stable foundation by placing heavier items like dinner plates at the bottom of each box, distributing weight evenly across the box bottom.
Stack plates vertically rather than horizontally when possible, as this orientation distributes weight more effectively and reduces pressure on individual pieces. Place plates on the edge, similar to records in a collection, with adequate padding between each piece.
Layer different dish types systematically, moving from heaviest to lightest as you work upward in the box. Bowls can nest inside each other with padding between, while cups and glasses need individual protection and upright positioning.
Use soft items like dish towels, cloth napkins, or clothing as additional padding between layers and around the perimeter of boxes. These items need packing anyway and provide excellent cushioning while serving dual purposes.
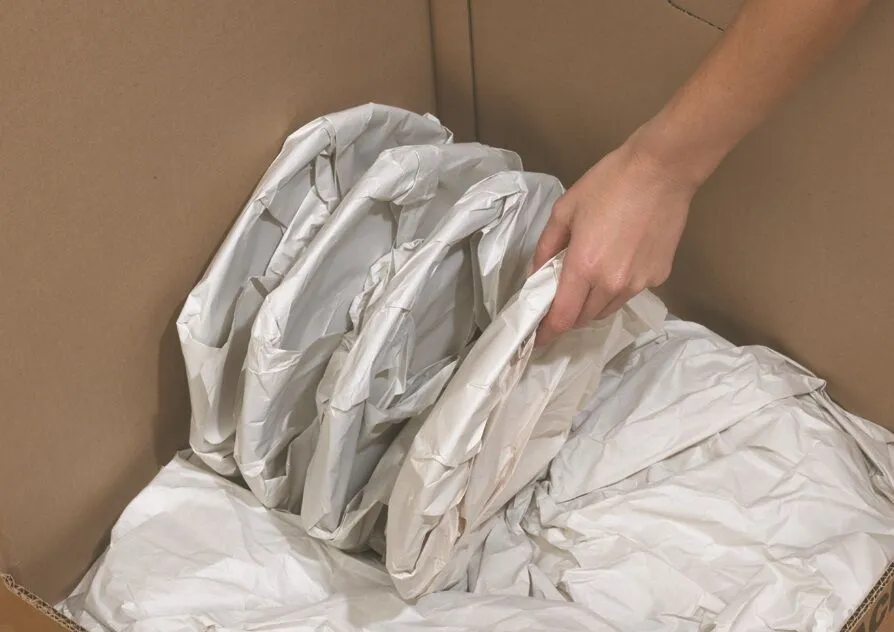
Fill empty spaces with crumpled packing paper or bubble wrap to prevent items from shifting during transport. Movement within boxes causes damage through friction and impact, so eliminating free space protects your dishes.
Maximizing Box Space
Efficient space utilization reduces the boxes needed while maintaining adequate protection for each item. Start with a cushioning layer at the box bottom using bubble wrap or crumpled packing paper to create a protective foundation.
Distribute weight evenly throughout each box to prevent overloading that could cause box failure or make boxes too heavy to lift safely. Aim for boxes that can be carried comfortably by one or two people rather than creating impossibly heavy packages.
Nest similar-sized items when possible, such as placing smaller bowls inside larger ones with padding between each piece. This technique maximizes space while keeping related items together for easier unpacking.
Layer items of different sizes to optimize space usage, fitting smaller pieces into gaps left by larger items. Coffee cups can fit between large plates, while small bowls can fill spaces around serving dishes.
Leave space at the top of each box for additional cushioning material that prevents contents from pressing against the box top during transport. This buffer zone absorbs impacts and prevents damage from compression.
Labeling for Easy Unpacking
Clear labeling systems help moving teams handle dish boxes appropriately and speed up the unpacking process in your new home. Mark boxes prominently with “FRAGILE” and “THIS SIDE UP” indicators to communicate special handling requirements.
Include detailed content descriptions that specify dish types and quantities rather than generic “dishes” labels. Information like “Everyday China – 8 place settings” or “Crystal stemware – 12 pieces” helps prioritize unpacking and placement.
Use room designations that match your new home’s layout to prevent confusion during delivery. “Kitchen – China Cabinet” provides more useful information than simply “Kitchen” when directing placement in specific areas.
Create priority coding that identifies boxes containing everyday dishes you’ll need immediately versus fine china that can wait for careful unpacking—Mark high-priority boxes with bright-colored labels or symbols.
Apply labels to multiple sides of each box to maintain visibility regardless of how boxes are stacked or positioned during transport. Waterproof markers prevent label information from becoming illegible if boxes are exposed to moisture.